Configuring the Matchmaking Logic
warning
This documentation is now deprecated. If you are using Matchmaker Self Serve though UDash, please use the documentation here.
Configuring the Matchmaking Logic#
In this tutorial, we will focus on configuring the matchmaking logic.
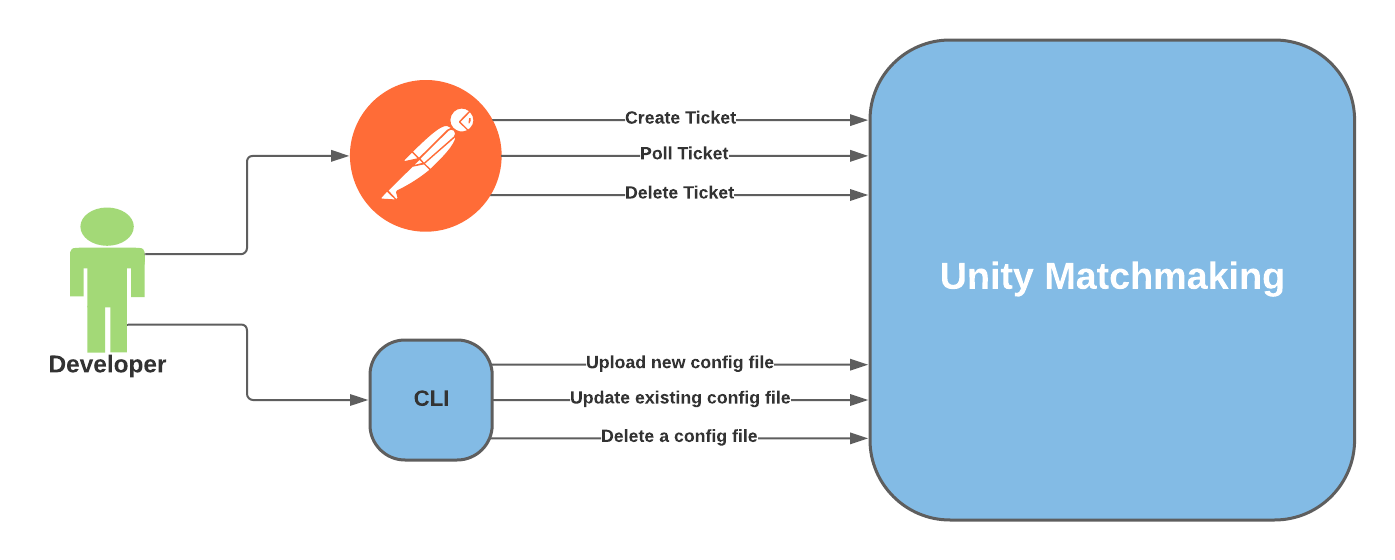
For the purposes of this tutorial, you can use Postman or CURL to create and poll tickets.
Flow Overview#
Prerequisites#
Ticket endpoint Authorization#
Before we can make any request to the tickets endpoint, we need to create some authorization tokens. Follow the Ticket Authorization Tutorial to create the required tokens before you continue with this tutorial.
Configuring the Matchmaking Logic#
Unity Matchmaker can be configured by creating a JSON formatted config file and uploading it using the Unity Matchmaker CLI.
A config file is how a developer is able to control how the matchmaking logic works. For more information about the different fields in the config file, make sure to check the Config File Contract Page
The following example config file configures the matchmaking logic to match tickets based on the following:
Two teams
HuntersandMonsters, each team consists of 1 to 2 players.The QoS strategy is set to
DefaultRegionto ignore all QoS information in tickets and match players into a predefined QoS region ID (A dummy value of000000-000000-00000Ain this tutorial).The
platformattribute is used to isolate tickets based on the platform for the ticket. The values here are arbitrary and should match what the Game Service provides in the ticket.
Creating the Config File#
Save the following config into a JSON formatted file with a {filename}.json of your choosing. (eg. 2v2-Hunter-v-Monsters-version1.json).
Uploading the Config File#
To upload the config file we created ({filename}.json), we will use the Unity Matchmaker CLI.
- After downloading the CLI from the Downloads Page, initialize the CLI using:
note
Replace {your UPID} with your Unity Project ID created on dashboard.unity3d.com
- Upload the config file we created earlier (
{filename}.json) using the following command:
The response will look similar to: Created config with id: {config-name}
Tickets#
A ticket is the basic unit of a matchmaking request. A ticket represents the gameplay intentions for a player or a group of players, and includes any data that is needed by your matchmaking logic to put players together into games.
Tickets include attributes and properties. The details of the contract for a ticket can be found at Ticket Contract
Attributes - indexable fields to use when querying for tickets from inside of match functions. Example attributes include map, mode, platform, players in the ticket, team skill, and games won. Note that attributes are currently limited to
doublevalues.Properties - a map of data that is available after a match function has retrieved tickets from a database. In the APIs, the property map is represented with the format
<string, byte[]>. Thebyte[]must be a Base64-encoded string (see the CreateTicket API documentation).
For more information, see the Tickets API documentation.
Creating a Ticket#
Using Postman, we will communicate with the matchmaker and create a ticket using a POST request.
To create a ticket, let's create a POST request on Postman on the following endpoint: https://cloud.connected.unity3d.com/{UPID}/matchmaking/api/v1/tickets. We will need to use the {all-access delegate token} created in the previous tutorial.
Header#
Key: Authorization
Value: Bearer {all-access delegate token}
Key: X-On-Behalf-Of
Value: {player-id}
Body#
note
The {player-id} used in the header will be used as the author of the ticket. Only a read-only-access delegate token with a user-id matching this value will be able to poll the ticket.
Response#
note
The {ticket-id} in the response is a unique identifier that can be used to poll for the ticket status.
Polling for a Ticket#
Using Postman, we will communicate with the matchmaker and poll a ticketId using a GET request.
To poll a ticket, let's create a GET request on Postman on the following endpoint: https://cloud.connected.unity3d.com/{UPID}/matchmaking/api/v1/tickets. We will need to use the {read-only-access delegate token} created in the previous tutorial.
note
The user-id in the read-only-access delegate token used must match the author of the ticket we are trying to poll.
note
An error attached to the ticket stating that the Multiplay max is zero for a fleet or region indicates that the maximum number of servers allowed for your fleet or region in Multiplay is zero. Reach out to your Multiplay representative to ensure your fleet/region have the limit increased.
Header#
Key: Authorization
Value: Bearer {read-only-access delegate token}
Params#
Key: id
Value: {ticket-id}
Response#
The matchProperties will include a json as follows:
Teams: An array ofStandardTeams.- Type:
List<StandardTeam>
- Type:
TeamName: An autogenerated field based that is a combination of theTeamNamedefined in the config file, and a number that identifies this specific team. (Ex. monsters0, monsters1, etc. if the monsters team allows more than one instance)- Type:
string
- Type:
TeamDefinitionName: This matches theTeamNamedefined in the config file.- Type:
string
- Type:
PlayerIds: A list of player ids that are matched on this team.- Type:
string
- Type:
note
The assignment field will only be populated when a match has been found. If a match has not been found, the assignment will remain null.
note
The connection field would be populated with server information from Multiplay if the Multiplay fields are configured correctly in the config file.
Deleting a Ticket#
Using Postman, we will communicate with the matchmaker and delete a ticket using a DELETE request.
To delete a ticket, let's create a DELETE request on Postman on the following endpoint: https://cloud.connected.unity3d.com/{UPID}/matchmaking/api/v1/tickets. We will need to use the {all-access delegate token} created in the previous tutorial.
note
The user-id in the read-only-access delegate token used must match the author of the ticket we are trying to poll.
Header#
Key: Authorization
Value: Bearer {all-access delegate token}
Key: X-On-Behalf-Of
Value: {player-id}
Params#
Key: id
Value: {ticket-id}
Response#
What's Next?#
- Create an end-to-end match in the End-to-End Match Tutorial