Agents
Table of Contents:
- Agents
- Decisions
- Observations and Sensors
- Generating Observations
- Agent.CollectObservations()
- Observable Fields and Properties
- ISensor interface and SensorComponents
- Vector Observations
- One-hot encoding categorical information
- Normalization
- Stacking
- Vector Observation Summary \& Best Practices
- Visual Observations
- Visual Observation Summary \& Best Practices
- Raycast Observations
- RayCast Observation Summary \& Best Practices
- Grid Observations
- Grid Observation Summary \& Best Practices
- Variable Length Observations
- Variable Length Observation Summary \& Best Practices
- Goal Signal
- Goal Signal Summary \& Best Practices
- Actions and Actuators
- Rewards
- Agent Properties
- Destroying an Agent
- Defining Multi-agent Scenarios
- Recording Demonstrations
An agent is an entity that can observe its environment, decide on the best
course of action using those observations, and execute those actions within its
environment. Agents can be created in Unity by extending the Agent class. The
most important aspects of creating agents that can successfully learn are the
observations the agent collects, and the reward you assign to estimate the value
of the agent's current state toward accomplishing its tasks.
An Agent passes its observations to its Policy. The Policy then makes a decision and passes the chosen action back to the agent. Your agent code must execute the action, for example, move the agent in one direction or another. In order to train an agent using reinforcement learning, your agent must calculate a reward value at each action. The reward is used to discover the optimal decision-making policy.
The Policy class abstracts out the decision making logic from the Agent itself
so that you can use the same Policy in multiple Agents. How a Policy makes its
decisions depends on the Behavior Parameters associated with the agent. If you
set Behavior Type to Heuristic Only, the Agent will use its Heuristic()
method to make decisions which can allow you to control the Agent manually or
write your own Policy. If the Agent has a Model file, its Policy will use the
neural network Model to take decisions.
When you create an Agent, you should usually extend the base Agent class. This includes implementing the following methods:
Agent.OnEpisodeBegin()— Called at the beginning of an Agent's episode, including at the beginning of the simulation.Agent.CollectObservations(VectorSensor sensor)— Called every step that the Agent requests a decision. This is one possible way for collecting the Agent's observations of the environment; see Generating Observations below for more options.Agent.OnActionReceived()— Called every time the Agent receives an action to take. Receives the action chosen by the Agent. It is also common to assign a reward in this method.Agent.Heuristic()- When theBehavior Typeis set toHeuristic Onlyin the Behavior Parameters of the Agent, the Agent will use theHeuristic()method to generate the actions of the Agent. As such, theHeuristic()method writes to the array of floats provided to the Heuristic method as argument. Note: Do not create a new float array of action in theHeuristic()method, as this will prevent writing floats to the original action array.
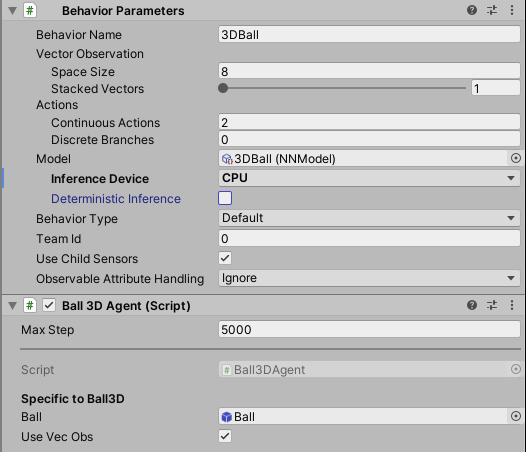
As a concrete example, here is how the Ball3DAgent class implements these methods:
Agent.OnEpisodeBegin()— Resets the agent cube and ball to their starting positions. The function randomizes the reset values so that the training generalizes to more than a specific starting position and agent cube orientation.Agent.CollectObservations(VectorSensor sensor)— Adds information about the orientation of the agent cube, the ball velocity, and the relative position between the ball and the cube. Since theCollectObservations()method callsVectorSensor.AddObservation()such that vector size adds up to 8, the Behavior Parameters of the Agent are set with vector observation space with a state size of 8.Agent.OnActionReceived()— The action results in a small change in the agent cube's rotation at each step. In this example, an Agent receives a small positive reward for each step it keeps the ball on the agent cube's head and a larger, negative reward for dropping the ball. An Agent's episode is also ended when it drops the ball so that it will reset with a new ball for the next simulation step.Agent.Heuristic()- Converts the keyboard inputs into actions.
Decisions
The observation-decision-action-reward cycle repeats each time the Agent request
a decision. Agents will request a decision when Agent.RequestDecision() is
called. If you need the Agent to request decisions on its own at regular
intervals, add a Decision Requester component to the Agent's GameObject.
Making decisions at regular step intervals is generally most appropriate for
physics-based simulations. For example, an agent in a robotic simulator that
must provide fine-control of joint torques should make its decisions every step
of the simulation. In games such as real-time strategy, where many agents make
their decisions at regular intervals, the decision timing for each agent can be
staggered by setting the DecisionStep parameter in the Decision Requester
component for each agent. On the other hand, an agent that only needs to make
decisions when certain game or simulation events occur, such as in a turn-based
game, should call Agent.RequestDecision() manually.
Observations and Sensors
In order for an agent to learn, the observations should include all the information an agent needs to accomplish its task. Without sufficient and relevant information, an agent may learn poorly or may not learn at all. A reasonable approach for determining what information should be included is to consider what you would need to calculate an analytical solution to the problem, or what you would expect a human to be able to use to solve the problem.
Generating Observations
ML-Agents provides multiple ways for an Agent to make observations:
1. Overriding the Agent.CollectObservations() method and passing the
observations to the provided VectorSensor.
1. Adding the [Observable] attribute to fields and properties on the Agent.
1. Implementing the ISensor interface, using a SensorComponent attached to
the Agent to create the ISensor.
Agent.CollectObservations()
Agent.CollectObservations() is best used for aspects of the environment which are
numerical and non-visual. The Policy class calls the
CollectObservations(VectorSensor sensor) method of each Agent. Your
implementation of this function must call VectorSensor.AddObservation to add
vector observations.
The VectorSensor.AddObservation method provides a number of overloads for
adding common types of data to your observation vector. You can add Integers and
booleans directly to the observation vector, as well as some common Unity data
types such as Vector2, Vector3, and Quaternion.
For examples of various state observation functions, you can look at the example environments included in the ML-Agents SDK. For instance, the 3DBall example uses the rotation of the platform, the relative position of the ball, and the velocity of the ball as its state observation.
public GameObject ball;

public override void CollectObservations(VectorSensor sensor)
{
    // Orientation of the cube (2 floats)
    sensor.AddObservation(gameObject.transform.rotation.z);
    sensor.AddObservation(gameObject.transform.rotation.x);
    // Relative position of the ball to the cube (3 floats)
    sensor.AddObservation(ball.transform.position - gameObject.transform.position);
    // Velocity of the ball (3 floats)
    sensor.AddObservation(m_BallRb.velocity);
    // 8 floats total
}
As an experiment, you can remove the velocity components from the observation and retrain the 3DBall agent. While it will learn to balance the ball reasonably well, the performance of the agent without using velocity is noticeably worse.
The observations passed to VectorSensor.AddObservation() must always contain
the same number of elements must always be in the same order. If the number
of observed entities in an environment can vary, you can pad the calls
with zeros for any missing entities in a specific observation, or you can limit
an agent's observations to a fixed subset. For example, instead of observing
every enemy in an environment, you could only observe the closest five.
Additionally, when you set up an Agent's Behavior Parameters in the Unity
Editor, you must set the Vector Observations > Space Size
to equal the number of floats that are written by CollectObservations().
Observable Fields and Properties
Another approach is to define the relevant observations as fields or properties
on your Agent class, and annotate them with an ObservableAttribute. For
example, in the Ball3DHardAgent, the difference between positions could be observed
by adding a property to the Agent:
using Unity.MLAgents.Sensors.Reflection;

public class Ball3DHardAgent : Agent {

    [Observable(numStackedObservations: 9)]
    Vector3 PositionDelta
    {
        get
        {
            return ball.transform.position - gameObject.transform.position;
        }
    }
}
ObservableAttribute currently supports most basic types (e.g. floats, ints,
bools), as well as Vector2, Vector3, Vector4, Quaternion, and enums.
The behavior of ObservableAttributes are controlled by the "Observable Attribute
Handling" in the Agent's Behavior Parameters. The possible values for this are:
* Ignore (default) - All ObservableAttributes on the Agent will be ignored.
If there are no ObservableAttributes on the Agent, this will result in the
fastest initialization time.
* Exclude Inherited - Only members on the declared class will be examined;
members that are inherited are ignored. This is a reasonable tradeoff between
performance and flexibility.
* Examine All All members on the class will be examined. This can lead to
slower startup times.
"Exclude Inherited" is generally sufficient, but if your Agent inherits from another Agent implementation that has Observable members, you will need to use "Examine All".
Internally, ObservableAttribute uses reflection to determine which members of the Agent have ObservableAttributes, and also uses reflection to access the fields or invoke the properties at runtime. This may be slower than using CollectObservations or an ISensor, although this might not be enough to noticeably affect performance.
NOTE: you do not need to adjust the Space Size in the Agent's
Behavior Parameters when you add [Observable] fields or properties to an
Agent, since their size can be computed before they are used.
ISensor interface and SensorComponents
The ISensor interface is generally intended for advanced users. The Write()
method is used to actually generate the observation, but some other methods
such as returning the shape of the observations must also be implemented.
The SensorComponent abstract class is used to create the actual ISensor at
runtime. It must be attached to the same GameObject as the Agent, or to a
child GameObject.
There are several SensorComponents provided in the API, including:
- CameraSensorComponent - Uses images from a Camera as observations.
- RenderTextureSensorComponent - Uses the content of a RenderTexture as
observations.
- RayPerceptionSensorComponent - Uses the information from set of ray casts
as observations.
- Match3SensorComponent - Uses the board of a Match-3 game
as observations.
- GridSensorComponent - Uses a set of box queries in a grid shape as
observations.
NOTE: you do not need to adjust the Space Size in the Agent's
Behavior Parameters when using SensorComponentss.
Internally, both Agent.CollectObservations and [Observable] attribute use an
ISensors to write observations, although this is mostly abstracted from the user.
Vector Observations
Both Agent.CollectObservations() and ObservableAttributes produce vector
observations, which are represented at lists of floats. ISensors can
produce both vector observations and visual observations, which are
multi-dimensional arrays of floats.
Below are some additional considerations when dealing with vector observations:
One-hot encoding categorical information
Type enumerations should be encoded in the one-hot style. That is, add an element to the feature vector for each element of enumeration, setting the element representing the observed member to one and set the rest to zero. For example, if your enumeration contains [Sword, Shield, Bow] and the agent observes that the current item is a Bow, you would add the elements: 0, 0, 1 to the feature vector. The following code example illustrates how to add.
enum ItemType { Sword, Shield, Bow, LastItem }
public override void CollectObservations(VectorSensor sensor)
{
    for (int ci = 0; ci < (int)ItemType.LastItem; ci++)
    {
        sensor.AddObservation((int)currentItem == ci ? 1.0f : 0.0f);
    }
}
VectorSensor also provides a two-argument function AddOneHotObservation() as
a shortcut for one-hot style observations. The following example is identical
to the previous one.
enum ItemType { Sword, Shield, Bow, LastItem }
const int NUM_ITEM_TYPES = (int)ItemType.LastItem + 1;

public override void CollectObservations(VectorSensor sensor)
{
    // The first argument is the selection index; the second is the
    // number of possibilities
    sensor.AddOneHotObservation((int)currentItem, NUM_ITEM_TYPES);
}
ObservableAttribute has built-in support for enums. Note that you don't need
the LastItem placeholder in this case:
enum ItemType { Sword, Shield, Bow }

public class HeroAgent : Agent
{
    [Observable]
    ItemType m_CurrentItem;
}
Normalization
For the best results when training, you should normalize the components of your feature vector to the range [-1, +1] or [0, 1]. When you normalize the values, the PPO neural network can often converge to a solution faster. Note that it isn't always necessary to normalize to these recommended ranges, but it is considered a best practice when using neural networks. The greater the variation in ranges between the components of your observation, the more likely that training will be affected.
To normalize a value to [0, 1], you can use the following formula:
normalizedValue = (currentValue - minValue)/(maxValue - minValue)
:warning: For vectors, you should apply the above formula to each component (x,
y, and z). Note that this is not the same as using the Vector3.normalized
property or Vector3.Normalize() method in Unity (and similar for Vector2).
Rotations and angles should also be normalized. For angles between 0 and 360 degrees, you can use the following formulas:
Quaternion rotation = transform.rotation;
Vector3 normalized = rotation.eulerAngles / 180.0f - Vector3.one;  // [-1,1]
Vector3 normalized = rotation.eulerAngles / 360.0f;  // [0,1]
For angles that can be outside the range [0,360], you can either reduce the angle, or, if the number of turns is significant, increase the maximum value used in your normalization formula.
Stacking
Stacking refers to repeating observations from previous steps as part of a larger observation. For example, consider an Agent that generates these observations in four steps
step 1: [0.1]
step 2: [0.2]
step 3: [0.3]
step 4: [0.4]
If we use a stack size of 3, the observations would instead be:
step 1: [0.1, 0.0, 0.0]
step 2: [0.2, 0.1, 0.0]
step 3: [0.3, 0.2, 0.1]
step 4: [0.4, 0.3, 0.2]
(The observations are padded with zeroes for the first stackSize-1 steps).
This is a simple way to give an Agent limited "memory" without the complexity
of adding a recurrent neural network (RNN).
The steps for enabling stacking depends on how you generate observations:
* For Agent.CollectObservations(), set "Stacked Vectors" on the Agent's
Behavior Parameters to a value greater than 1.
* For ObservableAttribute, set the numStackedObservations parameter in the
constructor, e.g. [Observable(numStackedObservations: 2)].
* For ISensors, wrap them in a StackingSensor (which is also an ISensor).
Generally, this should happen in the CreateSensor() method of your
SensorComponent.
Vector Observation Summary & Best Practices
- Vector Observations should include all variables relevant for allowing the agent to take the optimally informed decision, and ideally no extraneous information.
- In cases where Vector Observations need to be remembered or compared over
time, either an RNN should be used in the model, or the
Stacked Vectorsvalue in the agent GameObject'sBehavior Parametersshould be changed. - Categorical variables such as type of object (Sword, Shield, Bow) should be
encoded in one-hot fashion (i.e.
3->0, 0, 1). This can be done automatically using theAddOneHotObservation()method of theVectorSensor, or using[Observable]on an enum field or property of the Agent. - In general, all inputs should be normalized to be in the range 0 to +1 (or -1
to 1). For example, the
xposition information of an agent where the maximum possible value ismaxValueshould be recorded asVectorSensor.AddObservation(transform.position.x / maxValue);rather thanVectorSensor.AddObservation(transform.position.x);. - Positional information of relevant GameObjects should be encoded in relative coordinates wherever possible. This is often relative to the agent position.
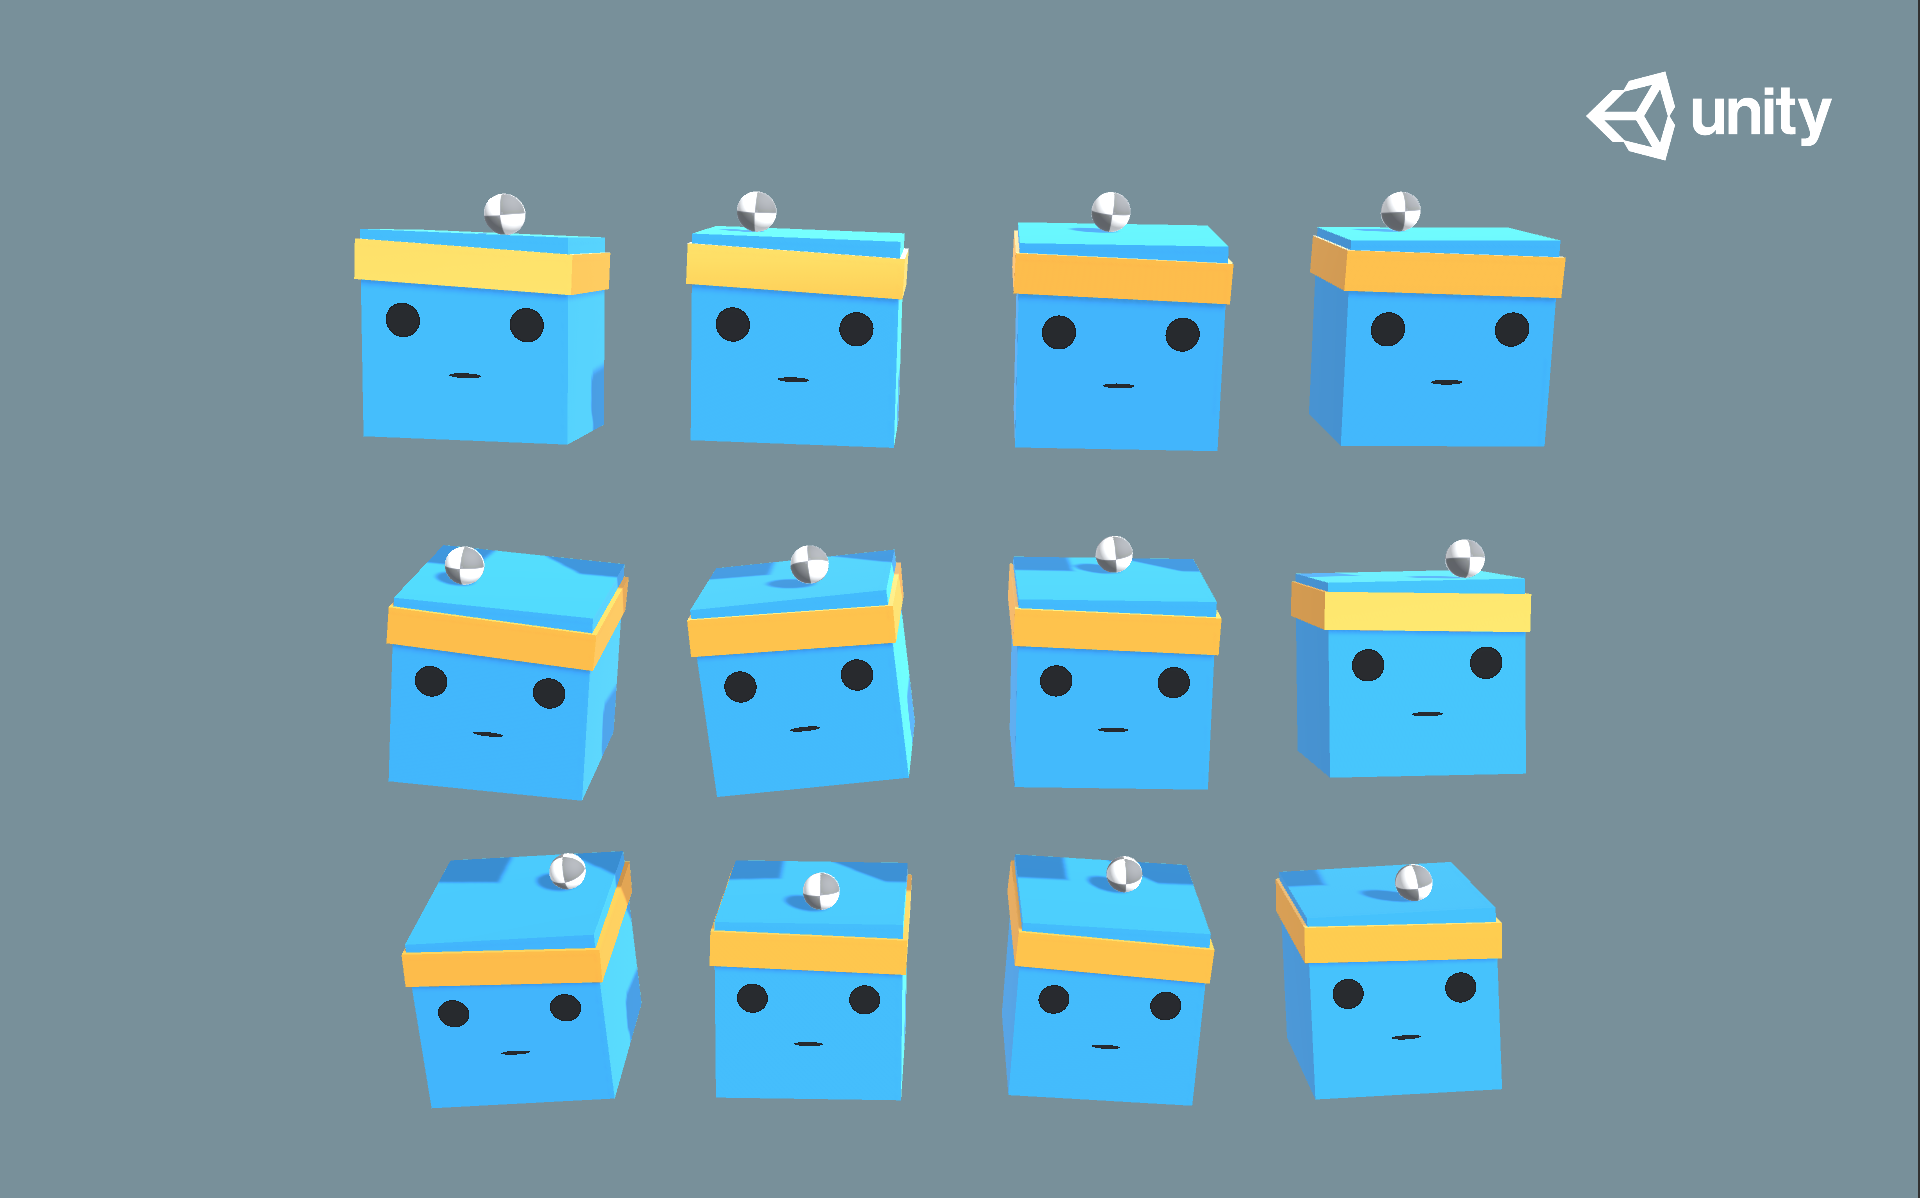
Visual Observations
Visual observations are generally provided to agent via either a CameraSensor
or RenderTextureSensor. These collect image information and transforms it into
a 3D Tensor which can be fed into the convolutional neural network (CNN) of the
agent policy. For more information on CNNs, see
this guide. This allows
agents to learn from spatial regularities in the observation images. It is
possible to use visual and vector observations with the same agent.
Agents using visual observations can capture state of arbitrary complexity and are useful when the state is difficult to describe numerically. However, they are also typically less efficient and slower to train, and sometimes don't succeed at all as compared to vector observations. As such, they should only be used when it is not possible to properly define the problem using vector or ray-cast observations.
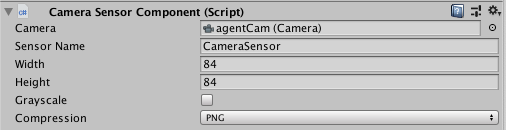
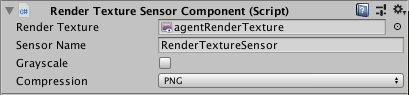
Visual observations can be derived from Cameras or RenderTextures within your
scene. To add a visual observation to an Agent, add either a Camera Sensor
Component or RenderTextures Sensor Component to the Agent. Then drag the camera
or render texture you want to add to the Camera or RenderTexture field. You
can have more than one camera or render texture and even use a combination of
both attached to an Agent. For each visual observation, set the width and height
of the image (in pixels) and whether or not the observation is color or
grayscale.
or
Each Agent that uses the same Policy must have the same number of visual observations, and they must all have the same resolutions (including whether or not they are grayscale). Additionally, each Sensor Component on an Agent must have a unique name so that they can be sorted deterministically (the name must be unique for that Agent, but multiple Agents can have a Sensor Component with the same name).
Visual observations also support stacking, by specifying Observation Stacks
to a value greater than 1. The visual observations from the last stackSize
steps will be stacked on the last dimension (channel dimension).
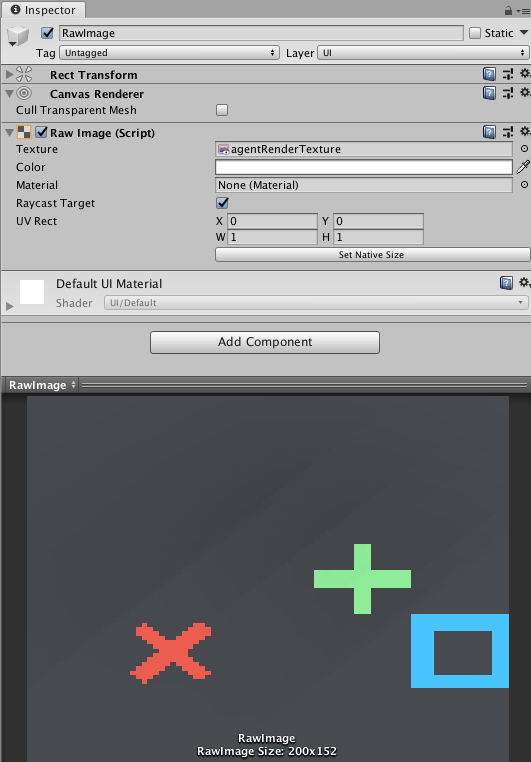
When using RenderTexture visual observations, a handy feature for debugging is
adding a Canvas, then adding a Raw Image with it's texture set to the
Agent's RenderTexture. This will render the agent observation on the game
screen.
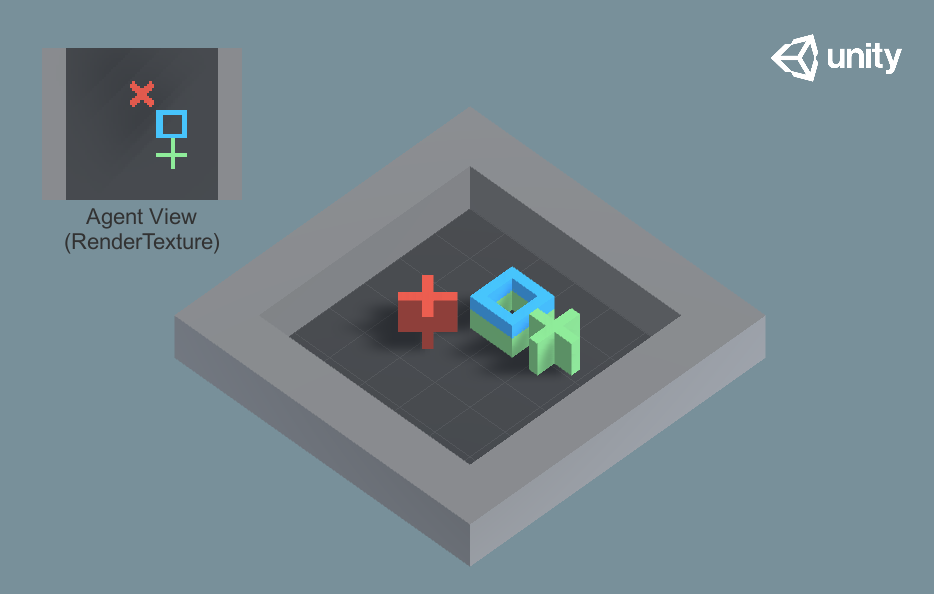
The GridWorld environment is an example on how to use a RenderTexture for both debugging and observation. Note that in this example, a Camera is rendered to a RenderTexture, which is then used for observations and debugging. To update the RenderTexture, the Camera must be asked to render every time a decision is requested within the game code. When using Cameras as observations directly, this is done automatically by the Agent.
Visual Observation Summary & Best Practices
- To collect visual observations, attach
CameraSensororRenderTextureSensorcomponents to the agent GameObject. - Visual observations should generally only be used when vector observations are not sufficient.
- Image size should be kept as small as possible, without the loss of needed details for decision making.
- Images should be made grayscale in situations where color information is not needed for making informed decisions.
Raycast Observations
Raycasts are another possible method for providing observations to an agent.
This can be easily implemented by adding a RayPerceptionSensorComponent3D (or
RayPerceptionSensorComponent2D) to the Agent GameObject.
During observations, several rays (or spheres, depending on settings) are cast into the physics world, and the objects that are hit determine the observation vector that is produced.

Both sensor components have several settings:
- Detectable Tags A list of strings corresponding to the types of objects that the Agent should be able to distinguish between. For example, in the WallJump example, we use "wall", "goal", and "block" as the list of objects to detect.
- Rays Per Direction Determines the number of rays that are cast. One ray is always cast forward, and this many rays are cast to the left and right.
- Max Ray Degrees The angle (in degrees) for the outermost rays. 90 degrees corresponds to the left and right of the agent.
- Sphere Cast Radius The size of the sphere used for sphere casting. If set to 0, rays will be used instead of spheres. Rays may be more efficient, especially in complex scenes.
- Ray Length The length of the casts
- Ray Layer Mask The LayerMask passed to the raycast or spherecast. This can be used to ignore certain types of objects when casting.
- Observation Stacks The number of previous results to "stack" with the cast
results. Note that this can be independent of the "Stacked Vectors" setting in
Behavior Parameters. - Start Vertical Offset (3D only) The vertical offset of the ray start point.
- End Vertical Offset (3D only) The vertical offset of the ray end point.
- Alternating Ray Order Alternating is the default, it gives an order of (0, -delta, delta, -2delta, 2delta, ..., -ndelta, ndelta). If alternating is disabled the order is left to right (-ndelta, -(n-1)delta, ..., -delta, 0, delta, ..., (n-1)delta, ndelta). For general usage there is no difference but if using custom models the left-to-right layout that matches the spatial structuring can be preferred (e.g. for processing with conv nets).
- Use Batched Raycasts (3D only) Whether to use batched raycasts. Enable to use batched raycasts and the jobs system.
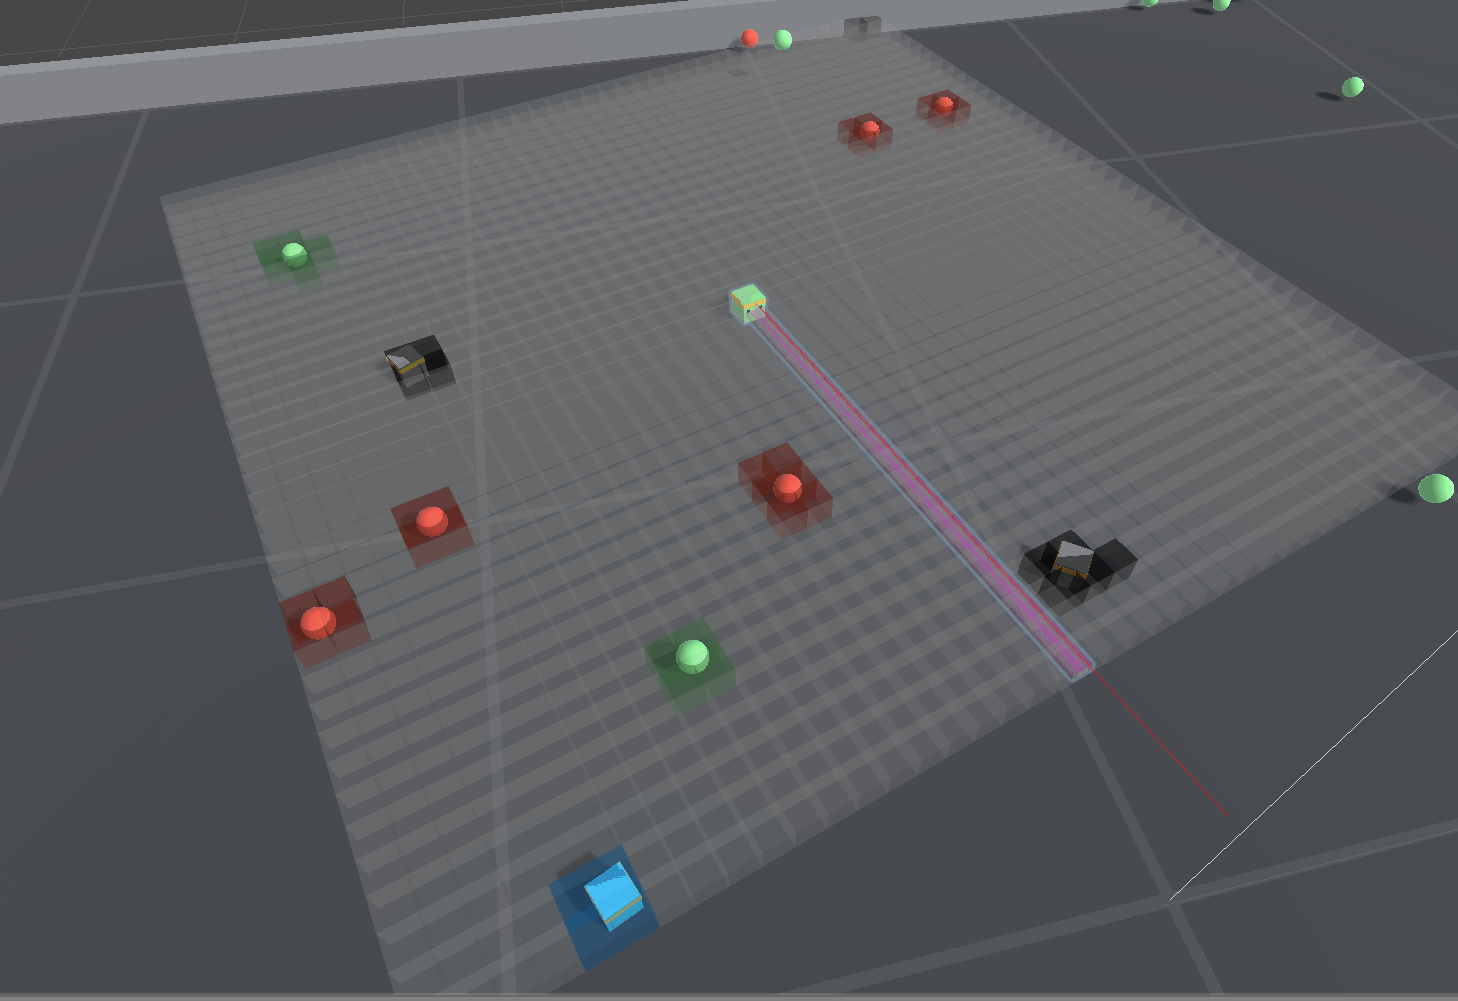
In the example image above, the Agent has two RayPerceptionSensorComponent3Ds.
Both use 3 Rays Per Direction and 90 Max Ray Degrees. One of the components had
a vertical offset, so the Agent can tell whether it's clear to jump over the
wall.
The total size of the created observations is
(Observation Stacks) * (1 + 2 * Rays Per Direction) * (Num Detectable Tags + 2)
so the number of rays and tags should be kept as small as possible to reduce the
amount of data used. Note that this is separate from the State Size defined in
Behavior Parameters, so you don't need to worry about the formula above when
setting the State Size.
RayCast Observation Summary & Best Practices
- Attach
RayPerceptionSensorComponent3DorRayPerceptionSensorComponent2Dto use. - This observation type is best used when there is relevant spatial information for the agent that doesn't require a fully rendered image to convey.
- Use as few rays and tags as necessary to solve the problem in order to improve learning stability and agent performance.
- If you run into performance issues, try using batched raycasts by enabling the Use Batched Raycast setting. (Only available for 3D ray perception sensors.)
Grid Observations
Grid-base observations combine the advantages of 2D spatial representation in
visual observations, and the flexibility of defining detectable objects in
RayCast observations. The sensor uses a set of box queries in a grid shape and
gives a top-down 2D view around the agent. This can be implemented by adding a
GridSensorComponent to the Agent GameObject.
During observations, the sensor detects the presence of detectable objects in each cell and encode that into one-hot representation. The collected information from each cell forms a 3D tensor observation and will be fed into the convolutional neural network (CNN) of the agent policy just like visual observations.
The sensor component has the following settings: - Cell Scale The scale of each cell in the grid. - Grid Size Number of cells on each side of the grid. - Agent Game Object The Agent that holds the grid sensor. This is used to disambiguate objects with the same tag as the agent so that the agent doesn't detect itself. - Rotate With Agent Whether the grid rotates with the Agent. - Detectable Tags A list of strings corresponding to the types of objects that the Agent should be able to distinguish between. - Collider Mask The LayerMask passed to the collider detection. This can be used to ignore certain types of objects. - Initial Collider Buffer Size The initial size of the Collider buffer used in the non-allocating Physics calls for each cell. - Max Collider Buffer Size The max size of the Collider buffer used in the non-allocating Physics calls for each cell.
The observation for each grid cell is a one-hot encoding of the detected object. The total size of the created observations is
GridSize.x * GridSize.z * Num Detectable Tags
so the number of detectable tags and size of the grid should be kept as small as possible to reduce the amount of data used. This makes a trade-off between the granularity of the observation and training speed.
To allow more variety of observations that grid sensor can capture, the
GridSensorComponent and the underlying GridSensorBase also provides interfaces
that can be overridden to collect customized observation from detected objects.
See the Unity package documentation for more details on custom grid sensors.
Note: The GridSensor only works in 3D environments and will not behave
properly in 2D environments.
Grid Observation Summary & Best Practices
- Attach
GridSensorComponentto use. - This observation type is best used when there is relevant non-visual spatial information that can be best captured in 2D representations.
- Use as small grid size and as few tags as necessary to solve the problem in order to improve learning stability and agent performance.
- Do not use
GridSensorin a 2D game.
Variable Length Observations
It is possible for agents to collect observations from a varying number of
GameObjects by using a BufferSensor.
You can add a BufferSensor to your Agent by adding a BufferSensorComponent to
its GameObject.
The BufferSensor can be useful in situations in which the Agent must pay
attention to a varying number of entities (for example, a varying number of
enemies or projectiles).
On the trainer side, the BufferSensor
is processed using an attention module. More information about attention
mechanisms can be found here. Training or
doing inference with variable length observations can be slower than using
a flat vector observation. However, attention mechanisms enable solving
problems that require comparative reasoning between entities in a scene
such as our Sorter environment.
Note that even though the BufferSensor can process a variable number of
entities, you still need to define a maximum number of entities. This is
because our network architecture requires to know what the shape of the
observations will be. If fewer entities are observed than the maximum, the
observation will be padded with zeros and the trainer will ignore
the padded observations. Note that attention layers are invariant to
the order of the entities, so there is no need to properly "order" the
entities before feeding them into the BufferSensor.
The BufferSensorComponent Editor inspector has two arguments:
Observation Size: This is how many floats each entities will be represented with. This number is fixed and all entities must have the same representation. For example, if the entities you want to put into theBufferSensorhave for relevant information position and speed, then theObservation Sizeshould be 6 floats.Maximum Number of Entities: This is the maximum number of entities theBufferSensorwill be able to collect.
To add an entity's observations to a BufferSensorComponent, you need
to call BufferSensorComponent.AppendObservation() in the
Agent.CollectObservations() method
with a float array of size Observation Size as argument.
Note: Currently, the observations put into the BufferSensor are
not normalized, you will need to normalize your observations manually
between -1 and 1.
Variable Length Observation Summary & Best Practices
- Attach
BufferSensorComponentto use. - Call
BufferSensorComponent.AppendObservation()in the Agent.CollectObservations() methodto add the observations of an entity to theBufferSensor. - Normalize the entities observations before feeding them into the
BufferSensor.
Goal Signal
It is possible for agents to collect observations that will be treated as "goal signal".
A goal signal is used to condition the policy of the agent, meaning that if the goal
changes, the policy (i.e. the mapping from observations to actions) will change
as well. Note that this is true
for any observation since all observations influence the policy of the Agent to
some degree. But by specifying a goal signal explicitly, we can make this conditioning
more important to the agent. This feature can be used in settings where an agent
must learn to solve different tasks that are similar by some aspects because the
agent will learn to reuse learnings from different tasks to generalize better.
In Unity, you can specify that a VectorSensor or
a CameraSensor is a goal by attaching a VectorSensorComponent or a
CameraSensorComponent to the Agent and selecting Goal Signal as Observation Type.
On the trainer side, there are two different ways to condition the policy. This
setting is determined by the
goal_conditioning_type parameter.
If set to hyper (default) a HyperNetwork
will be used to generate some of the
weights of the policy using the goal observations as input. Note that using a
HyperNetwork requires a lot of computations, it is recommended to use a smaller
number of hidden units in the policy to alleviate this.
If set to none the goal signal will be considered as regular observations.
For an example on how to use a goal signal, see the
GridWorld example.
Goal Signal Summary & Best Practices
- Attach a
VectorSensorComponentorCameraSensorComponentto an agent and set the observation type to goal to use the feature. - Set the goal_conditioning_type parameter in the training configuration.
- Reduce the number of hidden units in the network when using the HyperNetwork conditioning type.
Actions and Actuators
An action is an instruction from the Policy that the agent carries out. The
action is passed to the an IActionReceiver (either an Agent or an IActuator)
as the ActionBuffers parameter when the Academy invokes the
IActionReciever.OnActionReceived() function.
There are two types of actions supported: Continuous and Discrete.
Neither the Policy nor the training algorithm know anything about what the
action values themselves mean. The training algorithm simply tries different
values for the action list and observes the affect on the accumulated rewards
over time and many training episodes. Thus, the only place actions are defined
for an Agent is in the OnActionReceived() function.
For example, if you designed an agent to move in two dimensions, you could use either continuous or the discrete actions. In the continuous case, you would set the action size to two (one for each dimension), and the agent's Policy would output an action with two floating point values. In the discrete case, you would use one Branch with a size of four (one for each direction), and the Policy would create an action array containing a single element with a value ranging from zero to three. Alternatively, you could create two branches of size two (one for horizontal movement and one for vertical movement), and the Policy would output an action array containing two elements with values ranging from zero to one. You could alternatively use a combination of continuous and discrete actions e.g., using one continuous action for horizontal movement and a discrete branch of size two for the vertical movement.
Note that when you are programming actions for an agent, it is often helpful to
test your action logic using the Heuristic() method of the Agent, which lets
you map keyboard commands to actions.
Continuous Actions
When an Agent's Policy has Continuous actions, the
ActionBuffers.ContinuousActions passed to the Agent's OnActionReceived() function
is an array with length equal to the Continuous Action Size property value. The
individual values in the array have whatever meanings that you ascribe to them.
If you assign an element in the array as the speed of an Agent, for example, the
training process learns to control the speed of the Agent through this
parameter.
The 3DBall example uses continuous actions with two control values.
These control values are applied as rotation to the cube:
    public override void OnActionReceived(ActionBuffers actionBuffers)
    {
        var actionZ = 2f * Mathf.Clamp(actionBuffers.ContinuousActions[0], -1f, 1f);
        var actionX = 2f * Mathf.Clamp(actionBuffers.ContinuousActions[1], -1f, 1f);

        gameObject.transform.Rotate(new Vector3(0, 0, 1), actionZ);
        gameObject.transform.Rotate(new Vector3(1, 0, 0), actionX);
    }
By default the output from our provided PPO algorithm pre-clamps the values of
ActionBuffers.ContinuousActions into the [-1, 1] range. It is a best practice to manually clip
these as well, if you plan to use a 3rd party algorithm with your environment.
As shown above, you can scale the control values as needed after clamping them.
Discrete Actions
When an Agent's Policy uses discrete actions, the
ActionBuffers.DiscreteActions passed to the Agent's OnActionReceived() function
is an array of integers with length equal to Discrete Branch Size. When defining the discrete actions, Branches
is an array of integers, each value corresponds to the number of possibilities for each branch.
For example, if we wanted an Agent that can move in a plane and jump, we could
define two branches (one for motion and one for jumping) because we want our
agent be able to move and jump concurrently. We define the first branch to
have 5 possible actions (don't move, go left, go right, go backward, go forward)
and the second one to have 2 possible actions (don't jump, jump). The
OnActionReceived() method would look something like:
// Get the action index for movement
int movement = actionBuffers.DiscreteActions[0];
// Get the action index for jumping
int jump = actionBuffers.DiscreteActions[1];

// Look up the index in the movement action list:
if (movement == 1) { directionX = -1; }
if (movement == 2) { directionX = 1; }
if (movement == 3) { directionZ = -1; }
if (movement == 4) { directionZ = 1; }
// Look up the index in the jump action list:
if (jump == 1 && IsGrounded()) { directionY = 1; }

// Apply the action results to move the Agent
gameObject.GetComponent<Rigidbody>().AddForce(
    new Vector3(
        directionX * 40f, directionY * 300f, directionZ * 40f));
Masking Discrete Actions
When using Discrete Actions, it is possible to specify that some actions are
impossible for the next decision. When the Agent is controlled by a neural
network, the Agent will be unable to perform the specified action. Note that
when the Agent is controlled by its Heuristic, the Agent will still be able to
decide to perform the masked action. In order to disallow an action, override
the Agent.WriteDiscreteActionMask() virtual method, and call
SetActionEnabled() on the provided IDiscreteActionMask:
public override void WriteDiscreteActionMask(IDiscreteActionMask actionMask)
{
    actionMask.SetActionEnabled(branch, actionIndex, isEnabled);
}
Where:
branchis the index (starting at 0) of the branch on which you want to allow or disallow the actionactionIndexis the index of the action that you want to allow or disallow.isEnabledis a bool indicating whether the action should be allowed or now.
For example, if you have an Agent with 2 branches and on the first branch (branch 0) there are 4 possible actions : "do nothing", "jump", "shoot" and "change weapon". Then with the code bellow, the Agent will either "do nothing" or "change weapon" for their next decision (since action index 1 and 2 are masked)
actionMask.SetActionEnabled(0, 1, false);
actionMask.SetActionEnabled(0, 2, false);
Notes:
- You can call
SetActionEnabledmultiple times if you want to put masks on multiple branches. - At each step, the state of an action is reset and enabled by default.
- You cannot mask all the actions of a branch.
- You cannot mask actions in continuous control.
IActuator interface and ActuatorComponents
The Actuator API allows users to abstract behavior out of Agents and in to
components (similar to the ISensor API). The IActuator interface and Agent
class both implement the IActionReceiver interface to allow for backward compatibility
with the current Agent.OnActionReceived.
This means you will not have to change your code until you decide to use the IActuator API.
Like the ISensor interface, the IActuator interface is intended for advanced users.
The ActuatorComponent abstract class is used to create the actual IActuator at
runtime. It must be attached to the same GameObject as the Agent, or to a
child GameObject. Actuators and all of their data structures are initialized
during Agent.Initialize. This was done to prevent an unexpected allocations at runtime.
You can find an example of an IActuator implementation in the Basic example scene.
NOTE: you do not need to adjust the Actions in the Agent's
Behavior Parameters when using an IActuator and ActuatorComponents.
Internally, Agent.OnActionReceived uses an IActuator to send actions to the Agent,
although this is mostly abstracted from the user.
Actions Summary & Best Practices
- Agents can use
Discreteand/orContinuousactions. - Discrete actions can have multiple action branches, and it's possible to mask certain actions so that they won't be taken.
- In general, fewer actions will make for easier learning.
- Be sure to set the Continuous Action Size and Discrete Branch Size to the desired number for each type of action, and not greater, as doing the latter can interfere with the efficiency of the training process.
- Continuous action values should be clipped to an appropriate range. The provided PPO model automatically clips these values between -1 and 1, but third party training systems may not do so.
Rewards
In reinforcement learning, the reward is a signal that the agent has done something right. The PPO reinforcement learning algorithm works by optimizing the choices an agent makes such that the agent earns the highest cumulative reward over time. The better your reward mechanism, the better your agent will learn.
Note: Rewards are not used during inference by an Agent using a trained model and is also not used during imitation learning.
Perhaps the best advice is to start simple and only add complexity as needed. In general, you should reward results rather than actions you think will lead to the desired results. You can even use the Agent's Heuristic to control the Agent while watching how it accumulates rewards.
Allocate rewards to an Agent by calling the AddReward() or SetReward()
methods on the agent. The reward assigned between each decision should be in the
range [-1,1]. Values outside this range can lead to unstable training. The
reward value is reset to zero when the agent receives a new decision. If there
are multiple calls to AddReward() for a single agent decision, the rewards
will be summed together to evaluate how good the previous decision was. The
SetReward() will override all previous rewards given to an agent since the
previous decision.
Examples
You can examine the OnActionReceived() functions defined in the
example environments to see how those
projects allocate rewards.
The GridAgent class in the
GridWorld example uses a very
simple reward system:
Collider[] hitObjects = Physics.OverlapBox(trueAgent.transform.position,
                                           new Vector3(0.3f, 0.3f, 0.3f));
if (hitObjects.Where(col => col.gameObject.tag == "goal").ToArray().Length == 1)
{
    AddReward(1.0f);
    EndEpisode();
}
else if (hitObjects.Where(col => col.gameObject.tag == "pit").ToArray().Length == 1)
{
    AddReward(-1f);
    EndEpisode();
}
The agent receives a positive reward when it reaches the goal and a negative reward when it falls into the pit. Otherwise, it gets no rewards. This is an example of a sparse reward system. The agent must explore a lot to find the infrequent reward.
In contrast, the AreaAgent in the
Area example gets a small
negative reward every step. In order to get the maximum reward, the agent must
finish its task of reaching the goal square as quickly as possible:
AddReward( -0.005f);
MoveAgent(act);

if (gameObject.transform.position.y < 0.0f ||
    Mathf.Abs(gameObject.transform.position.x - area.transform.position.x) > 8f ||
    Mathf.Abs(gameObject.transform.position.z + 5 - area.transform.position.z) > 8)
{
    AddReward(-1f);
    EndEpisode();
}
The agent also gets a larger negative penalty if it falls off the playing surface.
The Ball3DAgent in the
3DBall takes a
similar approach, but allocates a small positive reward as long as the agent
balances the ball. The agent can maximize its rewards by keeping the ball on the
platform:
SetReward(0.1f);

// When ball falls mark Agent as finished and give a negative penalty
if ((ball.transform.position.y - gameObject.transform.position.y) < -2f ||
    Mathf.Abs(ball.transform.position.x - gameObject.transform.position.x) > 3f ||
    Mathf.Abs(ball.transform.position.z - gameObject.transform.position.z) > 3f)
{
    SetReward(-1f);
    EndEpisode();

}
The Ball3DAgent also assigns a negative penalty when the ball falls off the
platform.
Note that all of these environments make use of the EndEpisode() method, which
manually terminates an episode when a termination condition is reached. This can
be called independently of the Max Step property.
Rewards Summary & Best Practices
- Use
AddReward()to accumulate rewards between decisions. UseSetReward()to overwrite any previous rewards accumulate between decisions. - The magnitude of any given reward should typically not be greater than 1.0 in order to ensure a more stable learning process.
- Positive rewards are often more helpful to shaping the desired behavior of an agent than negative rewards. Excessive negative rewards can result in the agent failing to learn any meaningful behavior.
- For locomotion tasks, a small positive reward (+0.1) for forward velocity is typically used.
- If you want the agent to finish a task quickly, it is often helpful to provide
a small penalty every step (-0.05) that the agent does not complete the task.
In this case completion of the task should also coincide with the end of the
episode by calling
EndEpisode()on the agent when it has accomplished its goal.
Agent Properties
Behavior Parameters- The parameters dictating what Policy the Agent will receive.Behavior Name- The identifier for the behavior. Agents with the same behavior name will learn the same policy.Vector ObservationSpace Size- Length of vector observation for the Agent.Stacked Vectors- The number of previous vector observations that will be stacked and used collectively for decision making. This results in the effective size of the vector observation being passed to the Policy being: Space Size x Stacked Vectors.
ActionsContinuous Actions- The number of concurrent continuous actions that the Agent can take.Discrete Branches- An array of integers, defines multiple concurrent discrete actions. The values in theDiscrete Branchesarray correspond to the number of possible discrete values for each action branch.
Model- The neural network model used for inference (obtained after training)Inference Device- Whether to use CPU or GPU to run the model during inferenceBehavior Type- Determines whether the Agent will do training, inference, or use its Heuristic() method:Default- the Agent will train if they connect to a python trainer, otherwise they will perform inference.Heuristic Only- the Agent will always use theHeuristic()method.Inference Only- the Agent will always perform inference.
Team ID- Used to define the team for self-playUse Child Sensors- Whether to use all Sensor components attached to child GameObjects of this Agent.Max Step- The per-agent maximum number of steps. Once this number is reached, the Agent will be reset.
Destroying an Agent
You can destroy an Agent GameObject during the simulation. Make sure that there is always at least one Agent training at all times by either spawning a new Agent every time one is destroyed or by re-spawning new Agents when the whole environment resets.
Defining Multi-agent Scenarios
Teams for Adversarial Scenarios
Self-play is triggered by including the self-play hyperparameter hierarchy in the trainer configuration. To distinguish opposing agents, set the team ID to different integer values in the behavior parameters script on the agent prefab.

Team ID must be 0 or an integer greater than 0.
In symmetric games, since all agents (even on opposing teams) will share the same policy, they should have the same 'Behavior Name' in their Behavior Parameters Script. In asymmetric games, they should have a different Behavior Name in their Behavior Parameters script. Note, in asymmetric games, the agents must have both different Behavior Names and different team IDs!
For examples of how to use this feature, you can see the trainer configurations and agent prefabs for our Tennis and Soccer environments. Tennis and Soccer provide examples of symmetric games. To train an asymmetric game, specify trainer configurations for each of your behavior names and include the self-play hyperparameter hierarchy in both.
Groups for Cooperative Scenarios
Cooperative behavior in ML-Agents can be enabled by instantiating a SimpleMultiAgentGroup,
typically in an environment controller or similar script, and adding agents to it
using the RegisterAgent(Agent agent) method. Note that all agents added to the same SimpleMultiAgentGroup
must have the same behavior name and Behavior Parameters. Using SimpleMultiAgentGroup enables the
agents within a group to learn how to work together to achieve a common goal (i.e.,
maximize a group-given reward), even if one or more of the group members are removed
before the episode ends. You can then use this group to add/set rewards, end or interrupt episodes
at a group level using the AddGroupReward(), SetGroupReward(), EndGroupEpisode(), and
GroupEpisodeInterrupted() methods. For example:
// Create a Multi Agent Group in Start() or Initialize()
m_AgentGroup = new SimpleMultiAgentGroup();

// Register agents in group at the beginning of an episode
for (var agent in AgentList)
{
  m_AgentGroup.RegisterAgent(agent);
}

// if the team scores a goal
m_AgentGroup.AddGroupReward(rewardForGoal);

// If the goal is reached and the episode is over
m_AgentGroup.EndGroupEpisode();
ResetScene();

// If time ran out and we need to interrupt the episode
m_AgentGroup.GroupEpisodeInterrupted();
ResetScene();
Multi Agent Groups should be used with the MA-POCA trainer, which is explicitly designed to train
cooperative environments. This can be enabled by using the poca trainer - see the
training configurations doc for more information on
configuring MA-POCA. When using MA-POCA, agents which are deactivated or removed from the Scene
during the episode will still learn to contribute to the group's long term rewards, even
if they are not active in the scene to experience them.
See the Cooperative Push Block environment for an example of how to use Multi Agent Groups, and the Dungeon Escape environment for an example of how the Multi Agent Group can be used with agents that are removed from the scene mid-episode.
NOTE: Groups differ from Teams (for competitive settings) in the following way - Agents working together should be added to the same Group, while agents playing against each other should be given different Team Ids. If in the Scene there is one playing field and two teams, there should be two Groups, one for each team, and each team should be assigned a different Team Id. If this playing field is duplicated many times in the Scene (e.g. for training speedup), there should be two Groups per playing field, and two unique Team Ids for the entire Scene. In environments with both Groups and Team Ids configured, MA-POCA and self-play can be used together for training. In the diagram below, there are two agents on each team, and two playing fields where teams are pitted against each other. All the blue agents should share a Team Id (and the orange ones a different ID), and there should be four group managers, one per pair of agents.

Please see the SoccerTwos environment for an example.
Cooperative Behaviors Notes and Best Practices
-
An agent can only be registered to one MultiAgentGroup at a time. If you want to re-assign an agent from one group to another, you have to unregister it from the current group first.
-
Agents with different behavior names in the same group are not supported.
-
Agents within groups should always set the
Max Stepsparameter in the Agent script to 0. Instead, handle Max Steps using the MultiAgentGroup by ending the episode for the entire Group usingGroupEpisodeInterrupted(). -
EndGroupEpisodeandGroupEpisodeInterrupteddo the same job in the game, but has slightly different effect on the training. If the episode is completed, you would want to callEndGroupEpisode. But if the episode is not over but it has been running for enough steps, i.e. reaching max step, you would callGroupEpisodeInterrupted. -
If an agent finished earlier, e.g. completed tasks/be removed/be killed in the game, do not call
EndEpisode()on the Agent. Instead, disable the agent and re-enable it when the next episode starts, or destroy the agent entirely. This is because callingEndEpisode()will callOnEpisodeBegin(), which will reset the agent immediately. While it is possible to callEndEpisode()in this way, it is usually not the desired behavior when training groups of agents. -
If an agent that was disabled in a scene needs to be re-enabled, it must be re-registered to the MultiAgentGroup.
-
Group rewards are meant to reinforce agents to act in the group's best interest instead of individual ones, and are treated differently than individual agent rewards during training. So calling
AddGroupReward()is not equivalent to calling agent.AddReward() on each agent in the group. -
You can still add incremental rewards to agents using
Agent.AddReward()if they are in a Group. These rewards will only be given to those agents and are received when the Agent is active. -
Environments which use Multi Agent Groups can be trained using PPO or SAC, but agents will not be able to learn from group rewards after deactivation/removal, nor will they behave as cooperatively.
Recording Demonstrations
In order to record demonstrations from an agent, add the
Demonstration Recorder component to a GameObject in the scene which contains
an Agent component. Once added, it is possible to name the demonstration that
will be recorded from the agent.

When Record is checked, a demonstration will be created whenever the scene is
played from the Editor. Depending on the complexity of the task, anywhere from a
few minutes or a few hours of demonstration data may be necessary to be useful
for imitation learning. To specify an exact number of steps you want to record
use the Num Steps To Record field and the editor will end your play session
automatically once that many steps are recorded. If you set Num Steps To Record
to 0 then recording will continue until you manually end the play session. Once
the play session ends a .demo file will be created in the Assets/Demonstrations
folder (by default). This file contains the demonstrations. Clicking on the file will
provide metadata about the demonstration in the inspector.

You can then specify the path to this file in your training configurations.