Installation
The ML-Agents Toolkit contains several components:
- Unity package (
com.unity.ml-agents) contains the Unity C# SDK that will be integrated into your Unity project. This package contains a sample to help you get started with ML-Agents, including advanced features like custom sensors, input system integration, and physics-based components. - Two Python packages:
mlagentscontains the machine learning algorithms that enables you to train behaviors in your Unity scene. Most users of ML-Agents will only need to directly installmlagents.mlagents_envscontains a set of Python APIs to interact with a Unity scene. It is a foundational layer that facilitates data messaging between Unity scene and the Python machine learning algorithms. Consequently,mlagentsdepends onmlagents_envs.- Unity Project that contains several example environments that highlight the various features of the toolkit to help you get started.
Consequently, to install and use the ML-Agents Toolkit you will need to:
- Install Unity (6000.0 or later)
- Install Python (>= 3.10.1, <=3.10.12) - we recommend using 3.10.12
- Clone this repository (Recommended for the latest version and bug fixes)
- Note: If you do not clone the repository, then you will not be able to access the example environments and training configurations. Additionally, the Getting Started Guide assumes that you have cloned the repository.
- Install the
com.unity.ml-agentsUnity package - Install the
mlagents-envs - Install the
mlagentsPython package
Install Unity 6000.0 or Later
Download and install Unity. We strongly recommend that you install Unity through the Unity Hub as it will enable you to manage multiple Unity versions.
Install Python 3.10.12
We recommend installing Python 3.10.12.
If you are using Windows, please install the x86-64 version and not x86.
If your Python environment doesn't include pip3, see these
instructions
on installing it. We also recommend using conda or mamba to manage your python virtual environments.
Conda python setup
Once conda has been installed in your system, open a terminal and execute the following commands to setup a python 3.10.12 virtual environment and activate it.
conda create -n mlagents python=3.10.12 && conda activate mlagents
Clone the ML-Agents Toolkit Repository (Recommended)
Now that you have installed Unity and Python, you can now install the Unity and Python packages. You do not need to clone the repository to install those packages, but you may choose to clone the repository if you'd like download our example environments and training configurations to experiment with them (some of our tutorials / guides assume you have access to our example environments).
NOTE: There are samples shipped with the Unity Package. You only need to clone the repository if you would like to explore more examples.
git clone --branch release_22 https://github.com/Unity-Technologies/ml-agents.git
The --branch release_22 option will switch to the tag of the latest stable
release. Omitting that will get the develop branch which is potentially unstable.
However, if you find that a release branch does not work, the recommendation is to use
the develop branch as it may have potential fixes for bugs and dependency issues.
(Optional to get bleeding edge)
git clone https://github.com/Unity-Technologies/ml-agents.git
Advanced: Local Installation for Development
You will need to clone the repository if you plan to modify or extend the
ML-Agents Toolkit for your purposes. If you plan to contribute those changes
back, make sure to clone the develop branch (by omitting --branch release_22
from the command above). See our
Contributions Guidelines for more
information on contributing to the ML-Agents Toolkit.
Install the com.unity.ml-agents Unity package
The Unity ML-Agents C# SDK is a Unity Package. You can install the
com.unity.ml-agents package
directly from the Package Manager registry.
Please make sure you enable 'Preview Packages' in the 'Advanced' dropdown in
order to find the latest Preview release of the package.
NOTE: If you do not see the ML-Agents package listed in the Package Manager please follow the advanced installation instructions below.
Advanced: Local Installation for Development
You can add the local
com.unity.ml-agents package (from the repository that you just cloned) to your
project by:
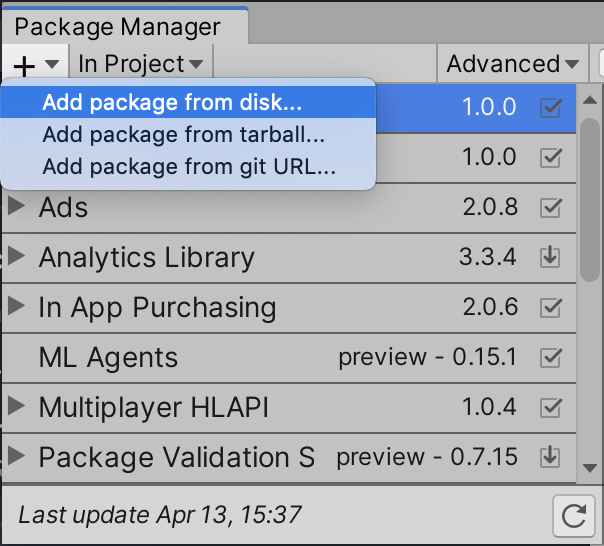
- navigating to the menu
Window->Package Manager. - In the package manager window click on the
+button on the top left of the packages list). - Select
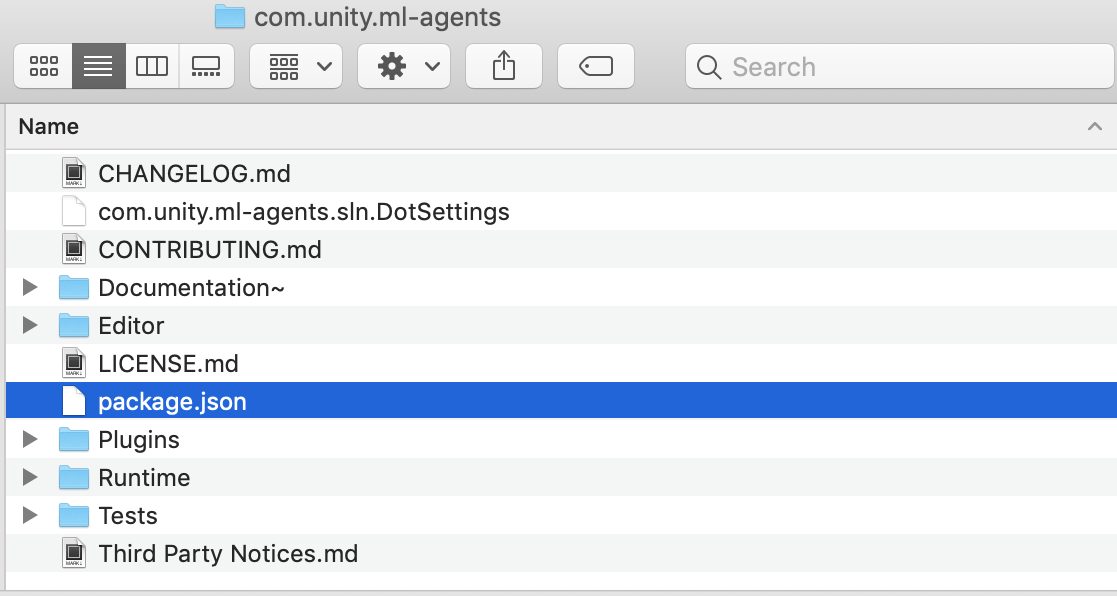
Add package from disk... - Navigate into the
com.unity.ml-agentsfolder. - Select the
package.jsonfile.
If you are going to follow the examples from our documentation, you can open the
Project folder in Unity and start tinkering immediately.
Install the mlagents Python package
Installing the mlagents Python package involves installing other Python
packages that mlagents depends on. So you may run into installation issues if
your machine has older versions of any of those dependencies already installed.
Consequently, our supported path for installing mlagents is to leverage Python
Virtual Environments. Virtual Environments provide a mechanism for isolating the
dependencies for each project and are supported on Mac / Windows / Linux. We
offer a dedicated guide on Virtual Environments.
(Windows) Installing PyTorch
On Windows, you'll have to install the PyTorch package separately prior to installing ML-Agents in order to make sure the cuda-enabled version is used, rather than the CPU-only version. Activate your virtual environment and run from the command line:
pip3 install torch~=2.2.1 --index-url https://download.pytorch.org/whl/cu121
Note that on Windows, you may also need Microsoft's Visual C++ Redistributable if you don't have it already. See the PyTorch installation guide for more installation options and versions.
Installing mlagents
To install the mlagents Python package, activate your virtual environment and
run from the command line:
cd /path/to/ml-agents
python -m pip install ./ml-agents-envs
python -m pip install ./ml-agents
Note that this will install mlagents from the cloned repository, not from the PyPi
repository. If you installed this correctly, you should be able to run
mlagents-learn --help, after which you will see the command
line parameters you can use with mlagents-learn.
NOTE: Since ML-Agents development has slowed, PyPi releases will be less frequent. However, you can install from PyPi by executing the following command:
python -m pip install mlagents==1.1.0
which will install the latest version of ML-Agents and associated dependencies available on PyPi. Note, you need to have the matching version of the Unity packages with the particular release of the python packages. You can find the release history here
By installing the mlagents package, the dependencies listed in the
setup.py file are also installed. These include
PyTorch.
Advanced: Local Installation for Development
If you intend to make modifications to mlagents or mlagents_envs, you should
install the packages from the cloned repository rather than from PyPi. To do
this, you will need to install mlagents and mlagents_envs separately. From
the repository's root directory, run:
pip3 install torch -f https://download.pytorch.org/whl/torch_stable.html
pip3 install -e ./ml-agents-envs
pip3 install -e ./ml-agents
Running pip with the -e flag will let you make changes to the Python files
directly and have those reflected when you run mlagents-learn. It is important
to install these packages in this order as the mlagents package depends on
mlagents_envs, and installing it in the other order will download
mlagents_envs from PyPi.
Next Steps
The Getting Started guide contains several short tutorials on setting up the ML-Agents Toolkit within Unity, running a pre-trained model, in addition to building and training environments.
Help
If you run into any problems regarding ML-Agents, refer to our FAQ and our Limitations pages. If you can't find anything please submit an issue and make sure to cite relevant information on OS, Python version, and exact error message (whenever possible).